
The users might often require to collect taxes for certain goods and services being offered. QuickBooks helps the user to keep an accurate record of taxes, so that the user could easily monitor and remit them to appropriate tax collecting agency. Are you looking for the process to set up sales tax in QuickBooks desktop? If yes, then you have landed on the right place. This article is a part of a series on sales tax. This covers the usual sales tax workflow in QuickBooks desktop.
- Setting up sales tax
- Collecting sales tax
- Reviewing sales tax reports
- Paying sales tax
This will also help in completing other sales tax related tasks
- Handling cash basis sales tax
- Sales tax adjustment
- Showing multiple sales tax items on an invoice
- Refunding sales tax collected from tax exempt customers
- Tracking sales tax on purchases from vendors
Well, if you are interested in knowing more about setting up sales tax in QuickBooks desktop, then reading this article ahead would really help you. Moreover, if you are seeking for any technical assistance, then in that case, do not hesitate in calling us anytime at our toll-free customer support number i.e. 1(844)521-0490. Our experts and certified professionals will ensure to provide the best possible support services.
You may also see: How to Sync QuickBooks Files Between Two Computers?
Steps to set up sales tax in QuickBooks desktop
Before you begin with the process, it is important to ensure that you check the tax rates and requirements with the tax agency. In order to start recording sales tax in QuickBooks, the user is required to turn on this feature and set up the sales tax items or tax groups. This can be done by carrying out the steps below:
Step 1: The very first step is to move to the Edit menu and also select Preferences.
Step 2: Now, on the preferences window, the user needs to select the sales tax and go to the company preferences tab
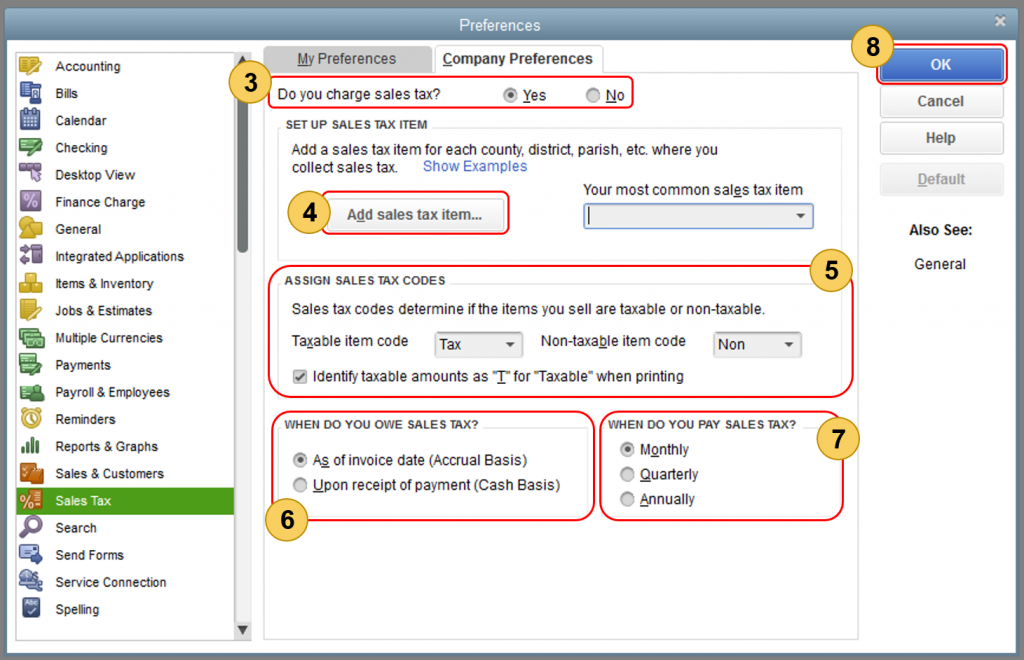
Step 3: After that, the user is recommended to select Yes to turn on sales tax
Step 4: Followed by setting up the sales tax items or sales tax groups for each country, district, city, etc, where the user collects the sales tax. After that, the user needs to click on the add sales tax items to do this.
Sales tax item
A sales tax item is used to add and calculate the tax charges when the user makes a taxable sale.
In order to create new sales tax items:
- The user needs to select sales tax item from the type drop-down
- And then, on the sales tax name field, the user needs to enter the preferred name for the tax item. It is recommended that the user is using the location of tax for the name. Moreover, the user can enter the information in the description field.
- Now, on the tax field, the user needs to enter the specific rate for the item
- Followed by on the tax agency field, the user needs to type the name of the collecting agency. In case the agency is not in the list yet, then user needs to select add new to set it up
- Also, hit OK button
In order to edit an existing sales tax item:
- For this, the user needs to move to the lists menu and then select item list
- Also, find the sales tax item needed to update
- Followed by, right clicking on the item, and then selecting edit item
- The user will then have to update information like the sales tax name, rate, and tax agency
- And also hit OK button.
Sales tax group
Setting up sales tax group for multiple sales tax items that might appear on the same sales transaction. When the user tries to set up a sales tax group, he/she can track and report sales taxes individually although, they show as a single line item on the invoices and sales receipts
- The user is supposed to select the sales tax group from the type drop-down menu.
- And then, on the group name/number field, the user needs to type the preferred name for the tax item group. Moreover, the user can enter the further information in the description field
- Also, enter the sales tax that is needed to be included in the group. In case the tax item is not set up yet, the user needs to enter add new.
- And hit OK button.
Step 5: The user is then required to assign sales tax codes. Sales tax codes help the user to track taxable and non-taxable sales and or customers. Setting up and assigning the correct sales tax code allows you to run a report that divides the total taxable and non-taxable sales. When the user turns on the sales tax in QuickBooks, two tax codes are created on their own, TAX and NON. The TAX is used for items and customer that you need to collect the tax for. Whereas, NON is used for items and customers that are exempted from tax such as non-profit organizations, out of state sales, or items that you customers will resell.
Setting up the non-taxable status of an item
- The user needs to move to the lists menu and then select the item list
- And then, on the item list window, the user needs to select item and then opt for new
- Also, from the tax code drop down, the user needs to choose non taxable sales
Setting up non taxable status of a customer
- For this, the user is supposed to move to the customers menu, and then select customer center
- And then, right click the customer name needed to set up as non-exempt, and then hit edit
- Now, on the edit customer screen, the user needs to move to the sales tax settings tab
- And from the tax code drop down, the user needs to select non-taxable sales. On the resale no. field, the user needs to enter the customer’s resale certification no.
- And then hit OK button
Creating specific tax codes
In case the user wants to create a tax code specific to the business needs, the user needs to select the tax code drop down and then select add new.
| Sales tax code | When to use |
| OOS | OUT-OF-STATE SALES. Many states do not charge sales tax for out-of-state sales. You might assign this sales tax code to a customer who has bought your product from your company catalog, but lives in another state. Many QuickBooks company files already include this non-taxable sales tax code. |
| LBR | LABOR. In many states, labor services are not taxed, so you might assign LBR to a service item. Some QuickBooks company files already include this non-taxable sales tax code. |
| NPO | NON-PROFIT ORGANIZATIONS. Such organizations are not charged sales tax, even if the products and services you sell are taxable. NPO would be assigned to a customer. |
| GOV | GOV. Sales to government offices, which are not taxed. |
| WHL | WHOLESALERS. Customers who are simply reselling the goods they buy from you. |
| RSL | RESELLERS. Customers who are reselling the products they buy from you or who are using your products to create a product of their own, which they then sell. |
Step 6: The user is then required to set the sales tax basis. Also, take into account the company’s accounting preference
Step 7: After that, set up preference for paying the sales tax
Step 8: And lastly, hit OK button.
Conclusion!
This brings us towards the end of this article, where we expect that the above stated information might be enough to set up sales tax in QuickBooks desktop. However, in case of any difficulty or if any of your queries remained unanswered, then in that case feel free to call us at any point of time.
You can simply make a call at our toll-free customer support number i.e. +1-844-521-0490. Our QuickBooks enterprise technical support team and certified accounting professionals will ensure to provide the best possible support services.
Similar Articles: