Learn how to Set up QuickBooks Workforce for your QuickBooks Desktop Like a Pro:
Looking for a comprehensive guide to setup QuickBooks workforce for QuickBooks desktop? If yes, then your search ends over here. This is a complete guide that will brief you with a step-by-step procedure to set up QuickBooks workforce for QuickBooks desktop. QuickBooks workforce makes it easy for the employees to view their paychecks, W-2’s, and other things that matter, like available time off and year-to-date earnings. One can provide the login id and password to the employees and let them access the QuickBooks workforce.
To know more about setting up QuickBooks workforce for QuickBooks desktop, reading this article ahead carefully is recommended. Moreover, for further assistance, you can grab your phone and get in touch with our team, we are a buzz away waiting to assist you. Ring up to us at +1-844-521-0490, and leave the rest on our team of professionals.
Related Article: How to Fix the QuickBooks Error Code 80029c4a?
What is QuickBooks Workforce?
QuickBooks workforce is basically a platform where the employees can keep a check on the working detail and details of salary. This basically means that the business owner will give the login credentials to their employee, which can be used to access their own account to see their paycheck details of each month. Moreover, QuickBooks workforce reduces the time and also saves money spent upon managing documents. The employee need not to send email and company data to employees. Also, one can directly get the response form the employee to make any changes. This will also reduce the paperwork and instance bookkeeping of sales and other documents. One can setup QuickBooks workforce for QuickBooks desktop, by carrying out a handful of steps, discussed later in this piece of writing.
Steps to set up the company file for QuickBooks workforce admin
In order to set up the company file for QuickBooks workforce admin, the below steps can be carried out:
- It should be noted that one must use QuickBooks desktop and also install the latest release and latest payroll updates
- In QuickBooks desktop company, the user should choose employees and then manage payroll cloud services. In case the user is unable to see the manage payroll cloud services option, then this might indicate that the user is having the latest QuickBooks desktop maintenance release or the latest payroll updates installed
- Now, under QuickBooks workforce in the payroll cloud services window, the user should toggle the status ON
- When asked to, the user needs to create or confirm a PIN used to send payroll data
- Followed by selecting save changes
- Once done with that, the user needs to choose return to QuickBooks in the confirmation window
- And then, the user needs to upload the paycheck info to Intuit next time payroll is being used, and especially when prompted
- It should be noted that, before employees can sign in for and access QuickBooks workforce, one needs to upload pay stubs. In order to upload paycheck info after every payroll:
- The user needs to create paychecks as usual in QuickBooks desktop company file
- Along with that, the user needs to ensure to select send to intuit on the confirmation and next steps screen
- After that, on the send/receive data window, then choose send. When asked, the user needs to enter the payroll service PIN.
- It should be noted that, before employees can sign in for and access QuickBooks workforce, one needs to upload pay stubs. In order to upload paycheck info after every payroll:
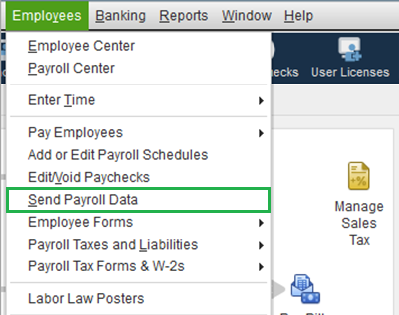
- It is recommended, if you miss to choose send to intuit after creating paychecks, then one can always move to the employees tab and choose send payroll data.
- In case this is the first time you are setting up QuickBooks workforce, then the user will have to upload historical paychecks in order, for the employees to view their pay stubs issues prior to setting up QuickBooks workforce.
Also See: How to Use the automated QuickBooks password reset tool?
Steps to be followed to confirm the account information with a code
When the user signs in to QuickBooks workforce using the Intuit account login, he/she might be asked to confirm the account information with a confirmation code. The steps to be followed under this process includes the following:
- Initially, the user needs to choose the way in which he/she will like to receive the code
- The user is then required to choose continue tab and the code will be sent
- In case the user is not having the access to the email listed anymore, then it is suggested to choose confirm my account a different way to update email
- Moreover, it is recommended to not to leave the screen before entering the confirmation code and open another window if needed
- The user needs to retrieve the confirmation code, and it might take some time for the code to arrive in the mailbox. The user might have to check the bulk/junk/spam mail folder to see if the code went there.
- Also, the user is suggested to enter the code and choose continue tab
- In case the user hasn’t received a code, then it is suggested to choose didn’t received a code
- After the user has been verified, he/she will automatically be signed in to QuickBooks workforce
Steps to invite the employees
Step 1: Logging in to the Intuit account in QuickBooks
In case the user hasn’t already logged in to Intuit account in QuickBooks, then it is recommended to login first. It should be noted that the intuit account login is different from the company file login. This can be done as follows:
- The user needs to first select my company from the company menu
- And also, choose the sign in tab on the top right corner
- Now, log in using the Intuit ID and password
Read Also: Fix QuickBooks Web Connect Import Error “No New Transactions”
Step 2: Sending an Invite
- Under this, the user needs to choose manage payroll cloud services from the employees menu. It should be noted that in case the user is unable to spot manage payroll cloud services, then it is recommended to update QuickBooks
- Now, under QuickBooks workforce, the user needs to toggle the status to ON, and also choose invite employees
- The employee list will appear after this and the user will have to choose the employees to whom the access is to be provided, and then add their email addresses.
- It should be noted if the invite the page doesn’t load, then the user should ensure to turn on ActiveX controls in internet explorer
- The last step is to choose send invite. And once sent, the user should see invited under the STATUS column
Steps to follow next
- The employees can set up and use QuickBooks workforce
- Also, after running payroll, the employees will get emails telling them that their paychecks are now available
- When the user processes W-2s, one can ensure that the employees can access the forms.
Steps to resend an invite
In case the employee hasn’t received any email invite, then it is recommended follow the required steps to resend invite and ensure that their email address is correct, and also choose the option to send invite again.
Steps for removing employee access
When the user is unable to remove an employee’s access to the paychecks, then the user can turn off QuickBooks workforce’s access to QuickBooks payroll. It isn’t recommended to do this, as it affects the employees. But if you want, then the below steps can be followed:
- At first, the user needs to choose manage payroll cloud services from the employees menu
- And then, under QuickBooks workforce, the user needs to toggle the status to off, and then hit save tab
Cancelling the payroll or terminating an employee
In case the user wants to turn off employee access as a result of cancelling QuickBooks payroll, then it is not needed. The employees will stop having access to their paychecks, W-2’s, and other employee info, as soon as one cancels the payroll service. This is quite similar to that when the user mark employees as terminated. The user needs to be sure to remind them beforehand to download or print any documents needed.
Also See: Fix QuickBooks Unrecoverable Error when Loading Record Merchant Service Deposits
To conclude!
The QuickBooks workforce is simply a link between employers and employees and this feature enhances the productivity. By the end of this article, it is expected that the user might be well versed with the steps to set up QuickBooks workforce for QuickBooks desktop.
However, in case any of your query remained unanswered, or in case the user needs any sort of assistance, then in that situation, one can directly get in touch with our QuickBooks enterprise customer support team of professionals at 1(844)521-0490, and let our experts carry out the process on your behalf.
Other helpful articles: