
Here is how you can setup the chart of accounts in QuickBooks
QuickBooks Chart of Accounts is a highly valuable tool for business owners and accountants. It’s a list of accounts that you can use to categorize income, expense, liabilities, etc. In the event that you need to see a specific detail of financial data on a report, you would need a valid account for that line item. Likewise, if you need a budget by a specific line item, you would need an account for the amount of budget. If some financial information on your income tax return has to be reported, an account to collect tax return data would be required. Despite being exceedingly useful, using QuickBooks Chart of Accounts is very simple. Here is a quick guide to help you create new records inside your Chart of Accounts list.
You may also read: How to Fix QuickBooks Update Payroll Error 403?
Different Types of Charts of Accounts in QuickBooks
These accounts types assist you in managing your business account simple and error-free.
Asset Account
This account type consists of the value of your valuables, vehicles, business, equipment, etc. Along with tracking the sum, you paid for the property, asset accounts also include aspects such as depreciation. Furthermore, it lists the values of assets in liquid forms such as checking accounts and other account types.
Liability accounts
Liability accounts consist of bank loans, mortgages, personal loans, credit card balances, and payable income tax. When you add debt or loan into the chart, you must include the total loan amount.
Income Accounts
This account type comprises of expenses, company revenues, cost of sales, and other incomes or expenses. Also, various accounts remain the same for all business forms wherein other accounts are specific to particular business types. While most income types are simple to generate, some require time, efforts and money.
Expense accounts
This account type helps you keep track of the money you spend. With the help of this account, you can track the cash that is not available with you. It’s advisable to divide the expenses into separate accounts. You can also choose to create subcategories for expenses.
Read Also: How to resolve Error 15215 in QuickBooks?
Step by Step Guide to Set-up QuickBooks Chart of Accounts List
Follow these steps to set-up the QuickBooks Chart of Accounts List.
Step 1. Choose the Account Lists – Chart of Accounts command
QuickBooks shows the Chart of Accounts window on your computer screen.
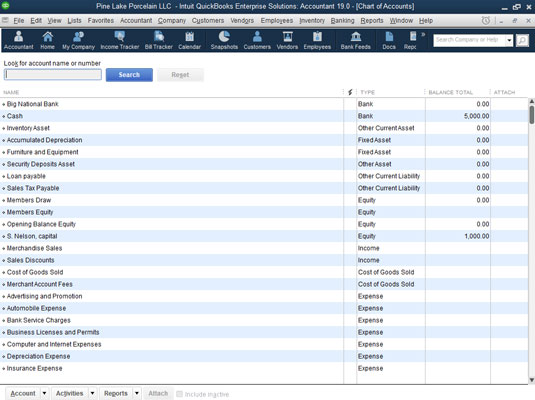
Step 2. Click on the Account button
QuickBooks Shows the Account menu. Among the Account menu options, one is New and functions as a command that you use to add a new account.
Step 3. Add a new account by selecting Account – New option
Now, you would see the First Add New Account on your computer screen.
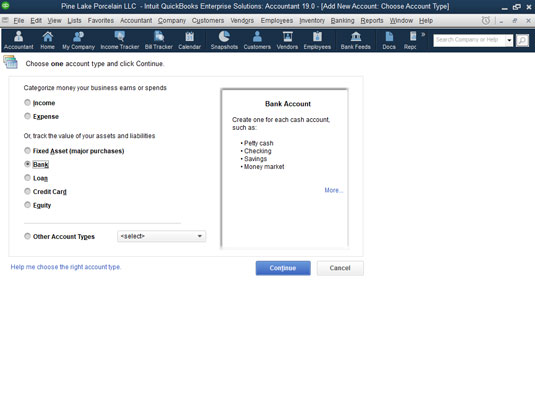
Step 4. Use the account-type tabs
Income, Expense, Loan, Credit Card, Equity, and Fixed Asset are some of the account types QuickBooks delivers. Other account types are Account Payable, Account Receivable, Other assets, Long Term Liability, Short Term Liability, Other Asset, etc. Using the account-type buttons, you can easily identify the location of your important data.
Step 5. Click Continue > Give a unique name to your new account using the Account Name box
You receive another Add New Account window. The name you put in for your account appears on your financial statements.
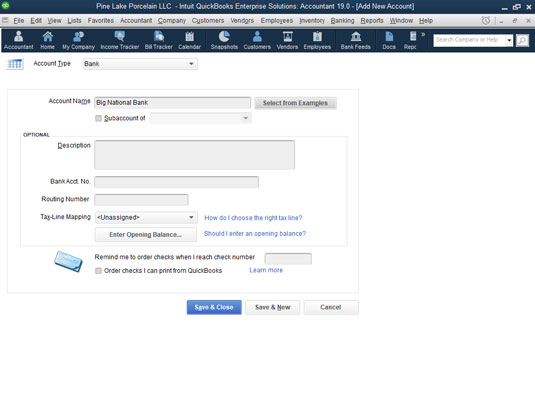
Step 6. If you add a sub-account of a parent account, classify the main account by selecting the Subaccount Of checkbox
Select the Subaccount Of checkbox and name the parent account from dropdown list for Subaccount.
Step 7. If you’re setting a bank account for a currency other than your home currency, select the bank account from the Currency drop-down list (Optional)
If QuickBooks is notified that you deal in more than one currency (you would have performed it during the QuickBooks EasyStep Interview setup process), QuickBooks would prompt you to identify those bank accounts, customers, businesses, and vendors that use a different currency unlike home currency.
To turn on this feature, select Edit, go to references command, select the Multiple Currencies preferences settings, tap on the Company Preferences tab, and check “Yes I Use More Than One Currency” radio button.
Read Also: Steps to Fix QuickBooks error 6123
Step 8. Provide a description for the new account (Optional)
You wouldn’t have to provide a description as it’s not necessary for QuickBooks to use the account name in a financial year without a description. If you like a more vivid descriptive label in the accounting reports, though using the Description box for this purpose.
Step 9. Provide details of other accounts
The version of the Add New Account – credit card – enables you to save the card number. For instance, if you have the availability of a couple of boxes in which you can store account information, use that location to gather details of data that you want to store.
Step 10. Identify the tax line where the account information has to be reported by selecting a tax form and tax line from the list of Tax-Line Mapping drop-down:
You may not necessarily require to assign a certain account to a tax line if that account data isn’t reported on the tax return of your business. Cash account balances can’t be reported on a sole proprietor’s tax return. If a bank account for a sole proprietor has no required tax line data. Cash account balances are included on a business’s tax return.
So if you attempt to add a bank account for a corporation, you can use the Tax-Line Mapping drop-down list to recognize the tax line on which the account information of your bank gets reported.
Step 11. Once you explain the new account that you wish to set up, click either Save and Close or Save and New to keep the new account to the Chart of Accounts list
Next, you can click the Next button to save the information related to the account and then feature again the Add New Account window for saving another account.
Winding up!
In case you require help in creating a setup chart of accounts in QuickBooks, you can contact our 24*7 QuickBooks enterprise support team at our toll-free +1-844-521-0490.
Other helpful recommended articles:
How to Fix QuickBooks Error code 15203?