
QuickBooks is the most versatile financial management software designed by Intuit. It possesses myriad features that are highly advantageous for its clients. Some of its features are generation of invoice, employee’s payroll, reports, tax filing, and much more. But it has been recognized that several users encounter a frequent error code that is – QuickBooks Error Code 6144.
In this technical post, we are going to discuss about this specific error code and its solution. However, if you need immediate help of the QuickBooks Error 6144 – you can speak with the QuickBooks enterprise support team at +1(800)969-7370 for proper guidance.
Important Points to Remember
Here are few things you need to remember before you begin the solution: –
- It recommended to practice all the steps on the host (server) system except the last step.
- Ensure that all the systems are properly shutdown including host & other.
- Turn-off the system security software.
Causes of QuickBooks error code 6144
- In case the installation of the software is corrupted or incorrect
- Or, the program files related to QuickBooks accounting software have been corrupted due to any kind of Trojan attack.
- In case the company files related to QuickBooks are deleted mistakenly
- Any kind of network issue can also be a valid reason behind the occurrence of this kind of error.
Read Also: How to fix resolve the QuickBooks Error -6177, 0?
How to Fix QuickBooks Error 6144?
Follow the steps by step manual process to fix the QuickBooks Error Code 6144 as shown below: –
Step 1: Start the QuickBooks Service Option
- In the QuickBooks, go to the “Start” icon and click on the “Services” tab.
- In the “Services” list, click on the “QBCFMonitoringservice” icon.
- Later, verify that the services started and are setup in the ‘Automatic Mode’.
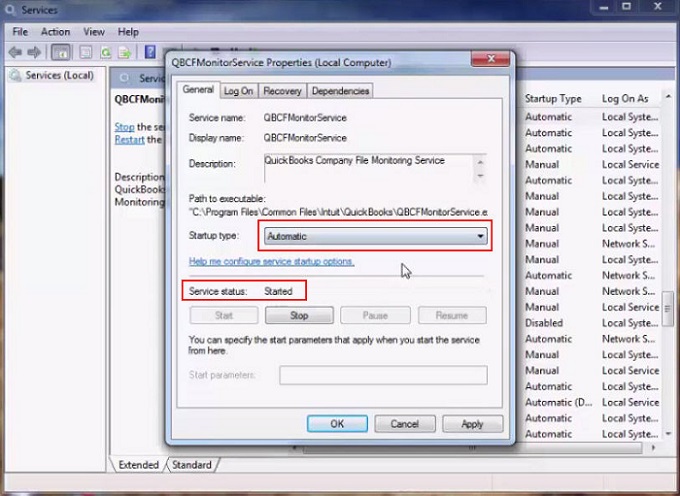
- If it’s not, then verify the “Radio” button and hit onto the “Apply” tab further “OK” icon.
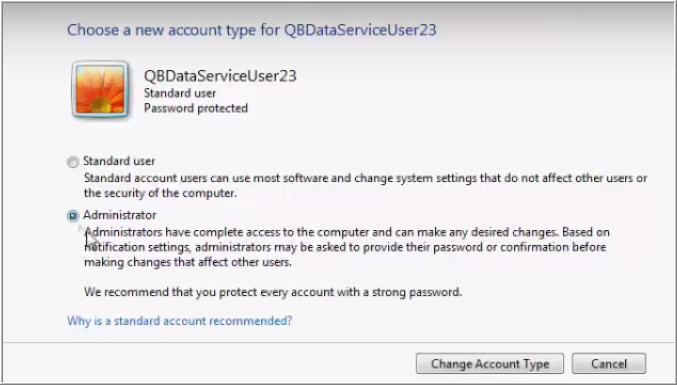
Step 2: Alter the Account Type
- Tap onto the “Start” icon on the keyboard.
- Go to the “Control Panel” tab and choose the “User Account” icon.
- Click on the “Add/Remove User Account” tab.
- Then, click onto the “QBDserviceuser23” icon and modify the account type as per the requirement by verifying “Administrator User” icon.
Step 3: Create the Folders in C Drive
QuickBooks user supposed to create new folder with the name of QB. Afterward, choose “Read/Write” options for all the created folders. Following folders are need to be created on the Drive C:
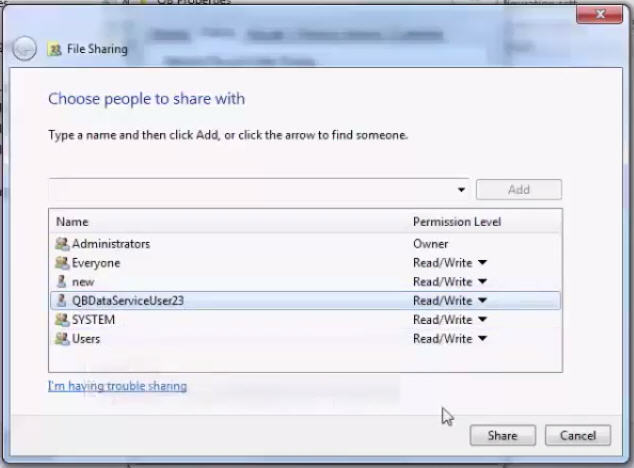
- Administrator
- Add System
- QBDataServiceuser23
- Add User
- Everyone
Endow Read/Write permission for the entire folders. Later, click on the “Share” icon to share all the entire folders to all the systems.
Step 4: Copy the QB Company file in New Folder “QB”
It has been observed that files corrupted due to the file size. Thus, it is unable to open on the QuickBooks.
- In the system ‘C Drive’, navigate to the “Users” option =>“Public” icon =>“Public Documents” tab =>“Intuit” icon =>“QuickBooks” icon =>“Company Files” tab. Here, you will see the default location of the Company files.
- Later, copy & paste the QB file in the new folder named as “QB”. Make sure that you do not cut – paste the QB Company file in the folder as it may cause corruption.
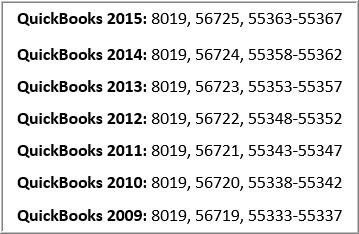
Step 5: Setup the Inbound & Outbound Firewall Rules
- In the “Firewall” tab, select the “Windows Firewall” option.
- In the “Advanced Settings” tab, go to the “Inbound Rules” icon =>“New Rule” icon =>“Port” icon. Lastly, click on the “Next” icon.
These are the port numbers for different versions:
Step 6: Optional Procedure
- Go to the “Programs” list, click on the “QuickBooks” icon.
- In the drop-down list, select the ‘QuickBooks Database Service Manager’ icon. Later, hit onto the “Add Folder” tab.
- In the system C Drive, search & add QuickBooks folder. Later, minimize this tab.
- Finally, click on the “Scan” icon. This will lead to the scanning process of QuickBooks Company file.
Read Also: How to fix QuickBooks abort error?
Step 7: Restore the QuickBooks Company Files
- On the server computer, open/access the QuickBooks in multi-user mode.
- Click on the “Open & Restore Existing Company Files”.
- Select the QB Company file “Get Back to Business”. Later, choose to open/access the files in the Multi-user mode.
- Confirm that the hosting enabled and go to the “File”. Later, click on the “Utilities” icon.
- Click on the “Stop Hosting on Main Computer” icon. Finally, the QB Company files will be accessible on the server computer.
Conclusion!
We hope that this technical blog post brought a lot of ease in your experience with the QuickBooks. In case, you think that you can follow all these steps accurately as given or it takes a lot of time – you can contact our QuickBooks support team without any hesitation. Dial our toll-free helpline number .i.e. +1(800)969-7370.
Thanks for spending your valuable time in reading this article. We hope that the information contained in this post might be of some help you.
You may also like