
Let’s explore some possible to install QuickBooks Desktop Pro on more than one system
Can I install QuickBooks desktop Pro on more than one system? Being a QuickBooks user, this question might have troubled you many times. Many users drop this query, and seek for a relevant answer for the same. Getting different answers from various professionals confuses every user, and the question stays intact. After thoroughly researching on this topic and viewing every possible aspect, our QuickBooks enterprise support team has come up with this article, where we will not only answer this question but also will provide the users with the entire process.
However, in case of any doubt, the user can get in touch with our technical support team via our toll-free number i.e. 1-844-521-0490, and clear all the clouds of confusion.
Read also: How to Fix QuickBooks Installation error code 1601?
Can a user install QuickBooks desktop pro on multiple systems?
Well, the answer to this question is a clear “YES”. It is possible for the users to install QuickBooks desktop Pro on multiple systems. The need for installing the software on multiple PC’s arises when the employees of the company require random access to the software. As per the norms of Intuit, the QB users might install a single-user license version on a system and also on a portable device, only in the case when the user for the both the devices are same i.e. both the devices are used by a single user.
Whereas, when it comes to installation of QuickBooks on additional systems for additional users, buying additional licenses is mandatory. The catch here is that, one can use up to five user licenses for QuickBooks Pro and it comes with one license. The QuickBooks enterprise users have a plus point that it comes with 10 licenses and permits up to 30 licenses.
Steps to Install QuickBooks Desktop Pro on more than one system
Step 1: Download QuickBooks software via CD
The very first step is to “insert the QuickBooks CD” and the QuickBooks installer opens up automatically. The user is required to right-click the “Start button” and select “Explore option” in case the dialog box doesn’t open. After that, the user is required to opt for the “QuickBooks CD in the Folders list”, followed by clicking on the “Setup.exe” for launching the Intuit QB installer. If the user has downloaded the QuickBooks software from the Intuit Website, the user is supposed to “double-click the downloaded installation file” to launch the intuit QuickBooks Installer. The user is then required to click on the “Next” button to go to the License Agreement.
Step 2: Select the type of installation to opt for
Now, the user is supposed to tick mark the check box to “I accept the terms of the license agreement” on the license agreement page, followed by clicking on to the “Next” option, in order to visit the “Choose Installation Type page”.
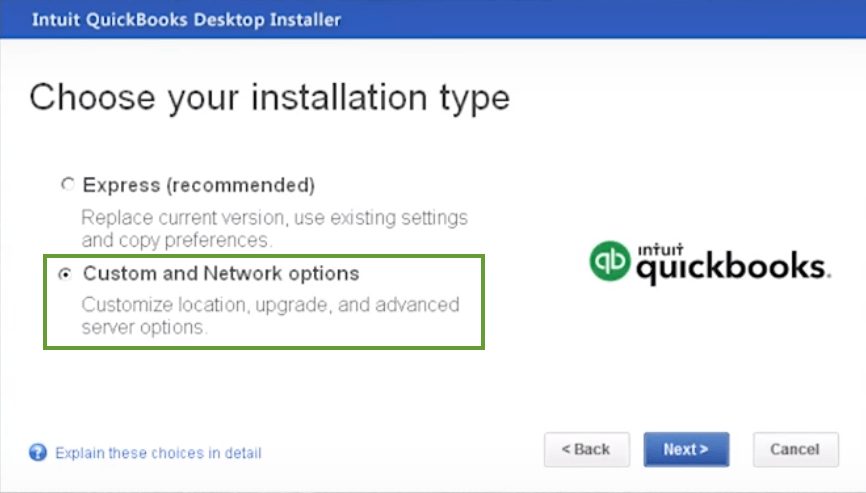
Step 3: Share QuickBooks over network
Moving to the next step, the user has to hit “Express on the choose installation type page” to get the recommendation for the QuickBooks on installation options. After that the user is required to choose the “Custom and Network” options, for sharing the QuickBooks desktop Pro across the network. The user can skip the next step, if he/she has selected the “Custom and network” options.
Related article:How to recover important data file from QuickBooks enterprise?
Step 4: Entering the license and product numbers
If you have opted for “Express” in the previous step, then hit “Next” to visit the License and Product number page. After that the user has to enter the “License and Product Number”. The user can find these details on the yellow sticker that came with the CD, in case he/she is still using the CD to install. Whereas, if the user is carrying out the installation from Intuit, then in that case these numbers could be found in the email that you received from Intuit. You can hop the next step.

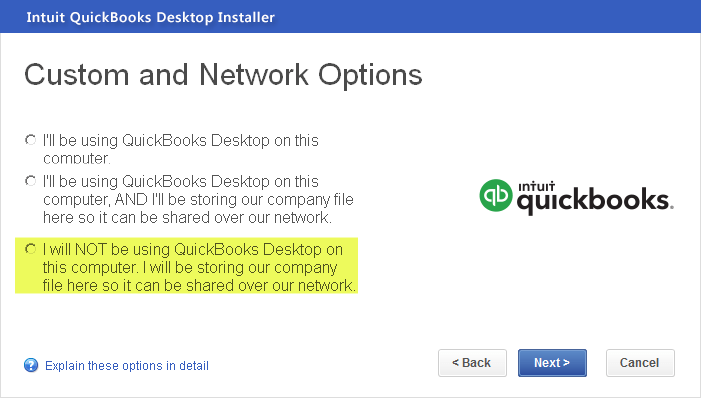
Step 5: Moving to the custom and network options
For the ones who select the “Custom and Network” option in the previous step, the user can click on to the “Next” option to visit the custom and network options page. The can go through the available options, and then click on to the “appropriate radio button”.
Step 6: Locating the installation location
Now the user is required to hit “Next” option to visit the “Upgrade or change installation location page”. And then the user is required to choose the “Change the installation location radio button” and tap on the “Browse” to navigate to a different location, if this is the option that you prefer. After that, click on to the next option to move to the “Ready to install page”.
Step 7: After this review the settings for accuracy
The next step is to “review the settings” on the Ready to install page for checking the accuracy. And then click on the “Install” for starting with the installation process.
Step 8: End the process of installation
Now moving to the next step, the user is supposed to check the “open QuickBooks” option and also the “Help me get started” option that would be present on the Congratulations page. After that, the user is supposed to click on to the “Finish” option and close the Intuit QuickBooks installer.
Step 9: Finalizing the software
This brings us to the end of this procedure. The user has to repeat the same steps to each of the system. It should be noted that it is not possible for the user to install the QuickBooks accounting software on a shared system and use the application on multiple systems. The software has to be installed on each system.
See Also: How to Fix QuickBooks Won’t Export to Excel Issue?
Final words!
The user is required to carry out the above listed 9 steps to install QuickBooks desktop pro on multiple systems. This might be a bit confusing for some of the QuickBooks users.
Therefore, they can speak to our accounting professionals and get answers to all their queries. Just dial our toll-free number i.e. +1(844)521-0490 and feel free to discuss your issue with our team of QuickBooks error support team and certified ProAdvisors.
You might also like:
Steps to Setup QuickBooks Desktop on a Mac using Parallels