
QuickBooks assists its users in importing invoices, along with handling transactions. You can stick to this guide, in order to learn the process to import invoices into QuickBooks online and QuickBooks desktop. QuickBooks import invoice service permits smooth transition from the previous application being used. It is very necessary for the user to know the right method to import invoices in QuickBooks, be it online or the desktop. One can easily import invoices from excel to QuickBooks directly.
If you want to learn the process to import invoices in QuickBooks online and desktop successfully, then in that case read this article carefully till the end. You can also contact our professionals for any sort of technical assistance at 1-844-521-0490. Our team professionals will ensure to answer all your queries immediately.
You may also see: How to Fix QuickBooks is Unable to Send your Email to Outlook Error?
Steps to import invoices into QuickBooks online and desktop
Below are the quick steps to import the invoices into the QuickBooks desktop and online versions:
Step 1: Importing invoices in QuickBooks 2013
- The user should launch the QuickBooks desktop
- Click on the file menu
- Move to the utilities tab
- Click on the import tab
- And select the excel files using the drop-down menu
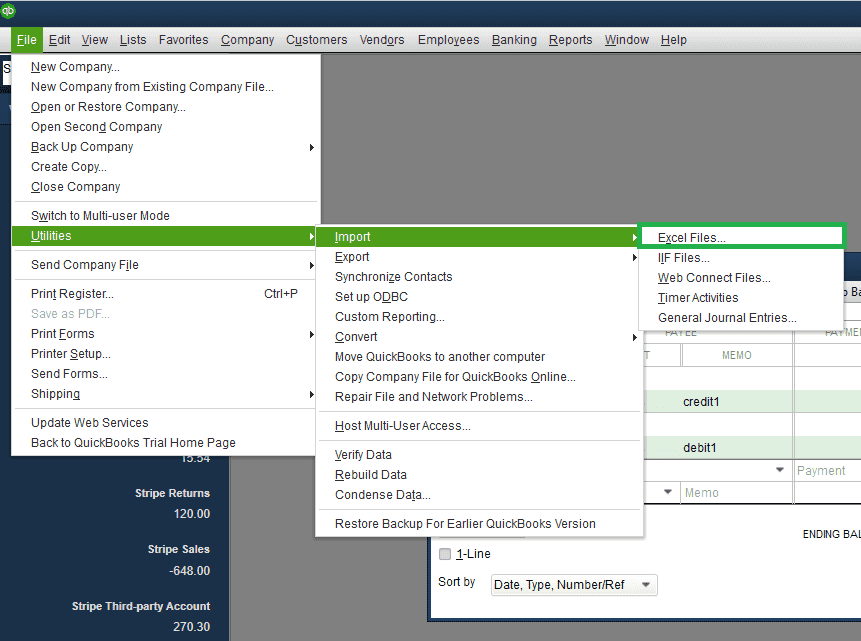
- Hit the no tab when asked in order to add multiple entries
Step 2: Importing invoice data into QuickBooks online
- The user should first launch to QuickBooks online
- Click on the file menu
- And move to the utilities tab
- Also, click on the import tab. This will open the QuickBooks import invoices window.
- Now, click on the excel files tab
- And select advance import and choose the file you wish to import
- Move to the preferences tab and decide how you want QuickBooks to handle the duplicate data or errors.
- Click on preview tab to view the invoices
- Click on ok tab and wait for the confirmation.
Step 3: Importing invoices into QuickBooks online using excel transactions
- Click on the upload file menu
- And look for the spreadsheet and file that have invoices to import.
- Further click on the QuickBooks entity as invoices.
- Map the column headers with invoice fields in QuickBooks
- Click the import tab in order to add the invoice to QuickBooks.
Similar article: Steps to Import and Export QuickBooks Data with MS Excel Files in QuickBooks
Step 4: Importing invoices into QuickBooks 2014 with IIF format
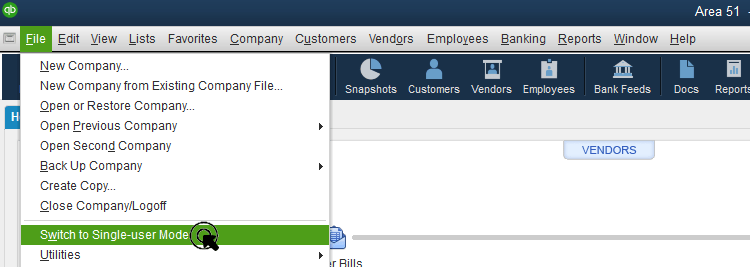
- The first step is to log in to the company file with admin rights.
- Move to the file option on the top.
- Click on the switch to single user mode.
- Hit the file tab.
- Click on utilities.
- Click on import
- Select the IIF files
- Browse the IIF file and hit open tab.
- Click on ok tab.
Step 5: Importing invoices in QuickBooks desktop using CSV format
- Move to the banking tab
- Click on the update drop down menu
- Choose the file upload or file to upload and select the saved .csv
- Hit next
- From the QuickBooks account drop down and select the account where you have to import
- Map the fields according to CSV file format
- Click on next and select the transactions to import.
- Click on yes
- When you get confirmation of the import and click on finish tab.
Also see: Configure firewall while for multi-user mode in QuickBooks
Step 6: Batch import invoices QuickBooks creating spreadsheet
Method 1: Creating a spreadsheet
Arranging columns based on the information you want to add to your invoices such as customer, invoice number, invoice date, item amount, due date, and item tax code.
Method 2: Enabling custom transaction numbers
- Click on settings
- Move to account and settings
- Click on sales tab
- Edit tab in the sales form content tab
- Click on the custom transaction numbers
- Select the save tab
- Click on done tab
Method 3: Upload the spreadsheet
- Click on the settings tab
- Select the import data option
- And click on the invoices
- In the browse section add the new products, customer and services if needed
- Hit the browse tab and select the spreadsheet that you just created
- Click on the next tab.
Also Read: Resolve Data Damage on your QuickBooks Company File
Importing invoices in QuickBooks online and desktop is pretty much easy, once you follow the above stated set of steps. However, if you are still unable to import the invoices successfully, then in that case feel free to contact our QuickBooks enterprise tech support team professionals at +1-844-521-0490. Our experts and certified professionals will ensure to provide you with immediate support services.
Mote helpful posts:
How to Reconcile an Account in QuickBooks Desktop?
Upgrade your Company Files after you Switch to a New Version of QuickBooks Desktop