Learn how to import or export MS-Excel files or transaction lists in QuickBooks desktop:
In search of the process to import or export QuickBooks data with MS excel files? The hunt ends over here, as this piece of writing is a full packed one that will brief you with all the steps involved in importing or exporting MS excel files. One can easily import customer, vendor, items, and charts of accounts from an excel spreadsheet. Moreover, there are tons of options available, while importing excel files from QuickBooks.
Today, we will be discussing each of the steps that can be followed, in order to import or export MS excel files. To know more, make sure to stick around the post till the end. Or you can connect with our toll-free number i.e. +1-844-521-0490, for understanding the entire process even better.
You may also see: How to use QuickBooks conversion tool?
Options in importing MS-excel files in QuickBooks desktop
There are a handful of the options, when it comes to importing excel files. Below we have jotted down the best of the options that would definitely work in your favor. Let us dive in to further explore each of the options one by one:
Option 1: Standard Import
It should be noted that QuickBooks accounting software opens a formatted excel spreadsheet where one can enter the information. When the user saves and closes the file, he/she can review results and view the data in QuickBooks. In order to import customers, vendors and products being sold, the below steps can be followed:
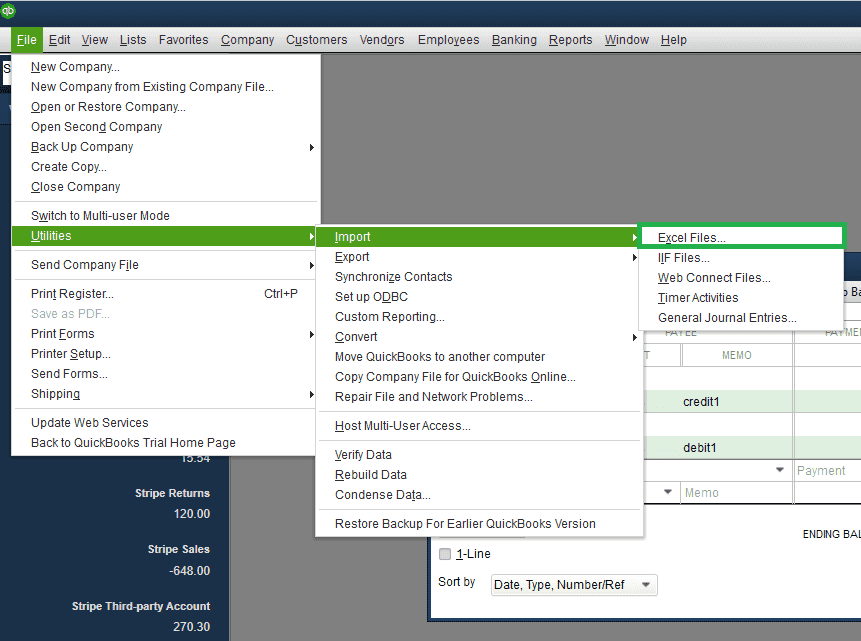
- The first step is to move to the file menu and also choose utilities tab and select import and hit excel files

- Now, in case the user gets the add/edit multiple list entries window, he/she is recommended to click on No
- Moving ahead, the user should follow the wizard in importing files
- Under this, the user should choose the type of data
- And QuickBooks will open a formatted excel spreadsheet. Once the user has entered the information, saved the file and closed it, then he/she will be given the option to add my data now
- Now, review results and view data in QuickBooks
- Also, choose close once done
It should be noted that, if the user needs to import additional customer, vendor, or item data from excel using this option, he/she can always move back to this window.
Steps to import chart of accounts
The most important point to note that is to create a backup of the company file before importing. The steps to be carried out under this process are as follows:
- First of all, the user should navigate to the lists menu and also choose chart of accounts

- After that, choose account drop down and also select import from excel
- Once done with that, select browse to choose the excel file to be imported
- Now, the user needs to choose the file and also choose open
- The user is then required to opt for the excel sheet where the data that has to be imported is present
- Moving ahead, the user needs to map the accounts
- Mapping the accounts tell QuickBooks how to import the data from the excel sheet. The column headings in QuickBooks might differ from that of excel, as a result of which the user needs to match them
- Here, the user needs to first type in a mapping name
- And then, choose account as import type
- After that, tally the information under QuickBooks with the column headings in excel sheet
- Followed by selecting save
- Mapping the accounts tell QuickBooks how to import the data from the excel sheet. The column headings in QuickBooks might differ from that of excel, as a result of which the user needs to match them
- The last step is to choose import. In case it is the first time you are importing, then select yes to confirm the process.
Read Also: How to Fix a Reconciliation Error in QuickBooks Desktop?
Option 2: Advanced import
For items
The user can carry out the below steps, in case he/she is importing items and isn’t having an excel or CSV file.
Important points to remember
- It should be noted that one cannot update the quantity on hand, the value on hand, or average cost of existing inventory items
- Also, the user can set up a quantity on hand and a value on hand of new inventory items and also establish average cost. Also, QuickBooks enters an adjust quantity value on hand debiting the item’s asset account and crediting opening balance equity
- In case the user wants to import item quantities or values and he/she is having advanced inventory and multiple inventory sites enabled, one must disable multiple inventory sites before importing
- Before importing the data, it is suggested to back up the QuickBooks company file without overwriting any previous backups
- Moreover, one cannot import subtotal, payment, and sales tax items via the advanced import function, but one can import them in an IIF file.
Steps to be followed
Step 1: Turning on inventory preferences
- Under this, the user needs to first sign in the company file as admin
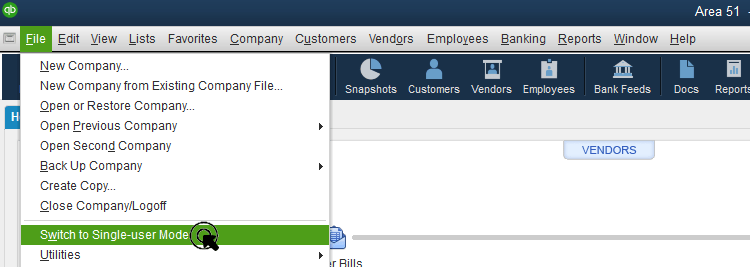
- And then, ensure that single user mode is enabled
- It should be noted that on the file menu, an option to switch to multi user mode should be available. In case it is not, then the user should choose switch to single user mode
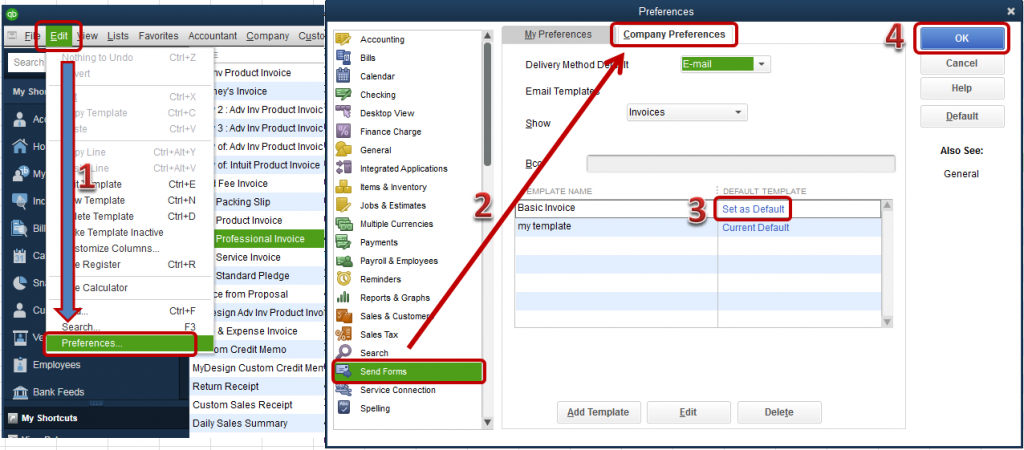
- Now, the user is supposed to select preferences from the QuickBooks edit menu
- Followed by selecting items and inventory on the left pane and also move to the company preferences tab
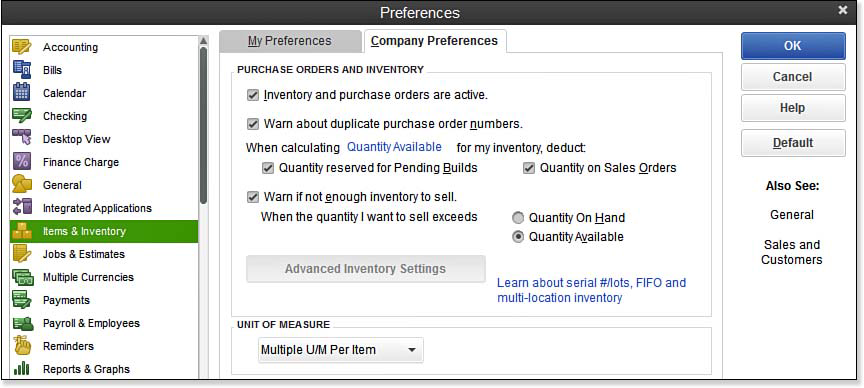
- The next step is to select the inventory and purchase order are active checkbox and also hit ok tab
Step 2: Setting up accounts in the data file
- First of all, the user needs to choose chart of accounts from the lists menu

- Followed by right clicking anywhere in the chart of accounts and hit new
- Now, choose the account type and also create the following account types:
- Income account to track sales
- Cost of goods sol account
- Inventory asset account
Step 3: Creating the data with the following for each item
- Item name
- Item type
- Description of the item
- Income account
- Inventory asset account
- Name of the COGS account
- On hand quantity
- Cost of item
- Sales price
- Total value
- As of date
- Is passed thru
See Also: How to Create, Setup QuickBooks Desktop Users & Restrictions?
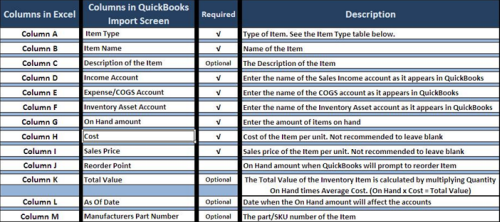
Step 4: Creating the spreadsheet
The user can go through the table guidelines, in order to create the spreadsheet.


Step 5: Preparing to import
The user should be sure about the location of the excel spreadsheet file. QuickBooks sync with the spreadsheet during the process. The steps to be followed under this process are as follows:
- At first, the user should start QuickBooks
- And then, open the company data file
- The next step is to back up the QuickBooks company file without overwriting the previous backup
Step 6: Importing the spreadsheet
- Under this method, the user needs to first move to the file menu and also choose utilities tab
- After that click on the import tab and then choose excel files
- The next step is to select no on the add/edit multiple list entries
- The user should also select advanced import
- Followed by setup a mapping
- Here, the user should select browse and select the excel file
- Also, choose the correct sheet in the excel workbook
- Now, choose the “This data file has header rows” checkbox to identify the available headers from the file
- The next step is to select add new on the choose a mapping dropdown
- On the mappings window
- Under this, the user needs to type a name to easily identify the mapping on the mapping name field
- And, from the import type dropdown, select the data being imported
- The next step is to match the QuickBooks and import data columns, and choose save tab
- Also, note that QuickBooks column displays the available customer fields in QuickBooks and import data column displays the available row headers on the excel file. In case the user isn’t having the data from the file that will match the fields in QuickBooks, then it is recommended to leave it blank
- Or the user can select the preview tab to verify the mapping
- Now, the user should select the import option to complete the import
- In case the user receives the duplicate record found error, then he/she will have certain options and the below steps can be followed to fix the error:
- The first step is to select the appropriate option
- Now, select apply or apply to all
- The user will then receive a notification indicating the number of successful imports and the number of errors. In case the user is having errors, then it is recommended to select save for the log and review it to determine the necessary action to fix the errors
- And also, re-import list as needed
The user is supposed to use the below option, in case he/she is importing customers, vendors, items, and other lists data and also the user will have an excel file or CSV data already formatted for QuickBooks. Here, the user needs to follow the below steps:
- At first, the user needs to select utilities from the file menu and then import and excel files should be selected
- And then, select no on the add/edit multiple list entries
- Now, choose advanced import
- Also, set up a mapping
- Here, the user needs to select browse and also select excel file
- Now, select the correct sheet in the excel workbook
- Also, select the “this data file has header rows” tab to identify the available headers from the file
- The user is then required to select add new on the choose a mapping dropdown
- On the mappings window
- The user needs to type a name to easily spot the mapping
- And then, from the import type dropdown, the user should select the data being imported
- Now, tally the QuickBooks and import data columns and hit save
- Also, select preview to verify the mapping
- And select the import tab to complete the import
- After this, if the user receives the duplicate record found error, then the below options would be seen:
- Keep existing data and discard import data
- Replace existing data with import data, ignoring blank fields
- Replace existing data with import data, including blank fields
- This can be fixed as:
- Select the correct option
- And then choose apply or apply to all
- Now, the user will see a notification indicating the number of successful imports and the number of errors. In case the user is having the errors, then it is suggested to select save for the error log and review it to determine the necessary action to fix the errors
- And lastly, re-import list as needed
You may also read: How to Use QuickBooks on Multiple Screens or in Multi-Monitor Mode?
Conclusion!
Towards the end of this article, it is believed that one might be able to successfully import or export MS excel files or transactions list in QuickBooks desktop. However, for further assistance, you can connect with our QuickBooks enterprise support team and accounting specialists today! Our technically sound experts will ensure to answer all your queries instantly.
More helpful resources:
How to Rectify QuickBooks Errors 1904 and 1402?
How Can I install QuickBooks Desktop Pro on more than one system?