
Learn how to troubleshoot Intuit data protect backup failed error
Before finding out the rectification steps for Intuit Data Protect Backup Failed: Firewall or connection issue, it is better to understand what is Intuit Data Protect. Intuit Data Protect, commonly known as IDP, is one of the finest subscription services by Intuit. This subscription allows the users to back-up the vital business information online that too on secure servers.
According to the experts, Intuit data protect can be easily integrated with the 2016 and also with the later versions of the QuickBooks accounting software. As this service gets activated, it takes the backup of the data on its own at the preferred timing each day. Not only that, this service is capable enough to take reinforcements of the information of the user accordingly. And for this, the requirement is to initiate the admin and pick a period for the reinforcement.
There are a lot more facts associated with IDP that we will be discussing in this article. Thus, if you want to explore those facts and also want to know the rectifications steps to the error Intuit Data Protect Backup failed, then go through the entire article.
For the ones who seek for immediate expert assistance, dialing our QuickBooks enterprise toll-free number i.e. +1-844-521-0490 would definitely work. We own a pool of certified ProAdvisors, who have years of experience and expertise in dealing with all kinds of errors associated with QuickBooks accounting software, and rectifying the Intuit data protect errors is nothing new to them. Thus, feel free to talk to our executives and discuss your issue with our professionals.
You may also like: How to create a Refund Receipt in QuickBooks?
What triggers this error?
Well, when it comes to the triggers or the reasons behind the failure of Intuit data protect backup, the reasons can be plenty. One of the most typical reason is that when the application is unable to access the file that requires to be backed up. Other than this, there can be numerous reasons due to which this type of error occurs. A few such errors are as follows:
- The very first reasons can be, if the company file that user is trying to take a backup for is opened on some other workstation already.
- Another reason can be when the IBuEngHost.exe process instead of admin user runs on the local user on Windows.
- The last reason can be when the operating system uses some other file system other than the NTFS.
Fixation methods for Intuit Data Protect Backup Failed: Firewall or connection issue
In regard to the daily automatic backup of the data, Intuit Data protect can be a great asset. But needless to say, even the IDP can at times fall into some issues, but resolving the issues is as easy as it is to get trapped in these issues. The Intuit Data Backup failed error can be easily faced by following certain manual procedures. There can be more than one procedures to tackle the error, and below we will be discussing each of them one by one. So, without wasting much time, let us explore each of the methods:
Solution @1: Running the Intuit Data Protect Diagnostic Tool
- To begin with, In the Windows System tray, the user is required to right-click the Intuit Data Protect icon, followed by selecting the About Intuit Data Protect.
- The next step is to press the Ctrl and F2 key simultaneously, in order to launch the “Intuit Data Protect Diagnostics Tool.”
- Moving ahead, the user is required to run the tool. In case the tool detects the issue with the firewall or third-party security software, the user is then required to reconfigure the software and/or hardware to allow the access to the IDP files. In order to gain the information about configuring the security software and/hardware, the user can check the manufacturer’s website and then the user can add the following files for exceptions:
- C:\Program Files(X86)\Common Files\Intuit\Data Protect\IntuitDataProtect.exe
- C:\Program Files(X86)\Common Files\Intuit\Data Protect\IbuEnghost.exe
- C:\Program Files(X86)\Common Files\Intuit\Data Protect\QBIDPServices.exe
Read also: How to Fix QuickBooks abort error?
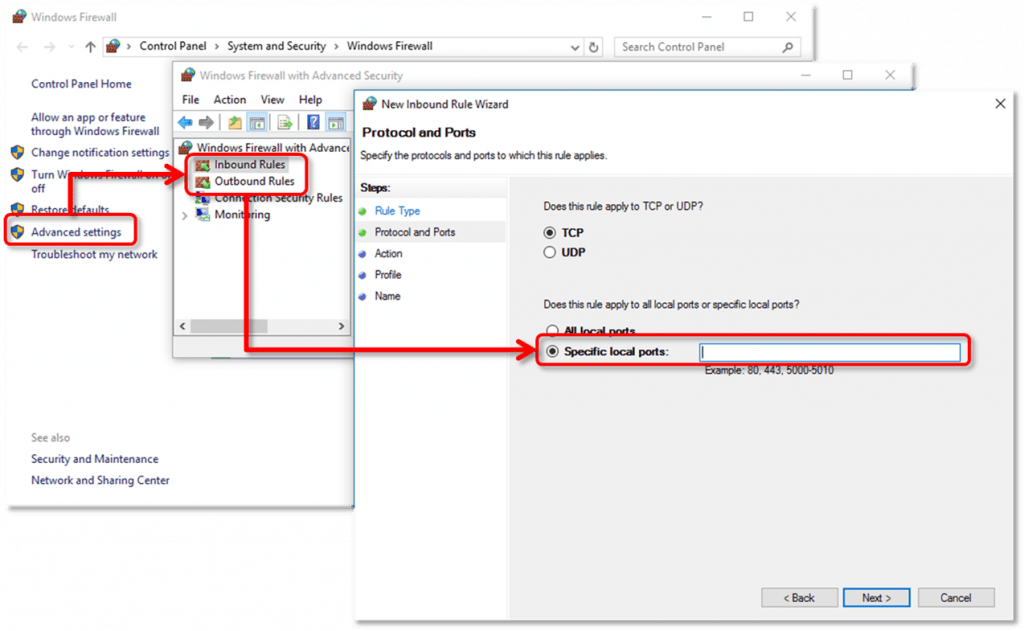
Solution @2: Adding Windows Firewall Ports
Now comes the second solution, which is the adding Windows Firewall ports in QuickBooks. For this, the user is required to follow certain steps, which includes:
- To start this process, the user is required to open the Control Panel in the system.
- Once done with that, the user is required to navigate to the system and security section.
- Now, click on the Windows Firewall option, followed by choosing the Advanced settings.
- The next step is to visit the Advanced settings window and also clock on to the Inbound Rules option.
- Moving ahead, the user is required to click on the New Rule option.
- Now, enter the ports and click on the Next option.
- Incoming Port: 80
- Outgoing Ports: 443, 16841
- Move ahead by following the on screen prompts.
- For the Outbound Rules, the user is required to repeat the first four steps.
Solution @3: Clearing the Internet Explorer Cache, Cookies, Temporary Files, and SSL State
- The very first step is to open the Internet Explorer.
- Once done with that, the user is required to visit the tools and then choose the Internet Options. The user is required to note that if the user is unable to find the tools on the browser, tap on to Alt once to un-hide the hidden tabs.
- The next step is to go to the General tab, and then choose the delete option, present under the browsing history section.
- The user is then required to check the following boxes: Temporary Internet files and website files, Cookies and website data, history, form data, and also the InPrivate Filtering. Once done with that, the user is required to un-check the Preserve favorites and the website data box.
- After completing the above step, the user is required to select the Delete option, in order to clear the items.
- Now, go to the Content tab.
- Finally, select the Clear SSL state, tap on the OK tab and you are good to go.
Solution @4: Adding the trusted sites
In case the above three solutions do not work in your favor, you can carry out the steps below:
- To begin with, open the Internet Explorer
- Visit the Tools menu and then choose Internet options.
- Now, visit the Security tab and then un-check the Enable Protected Mode box.
- The next step is to choose the Trusted sites > Sites
- After that, uncheck the Require Server verification
- Once done with that, add *.backup.com, *.intuit.com, and *intuit.net. and then Choose the Close option.
- The next step is to visit the Privacy tab and then choose the Sites
- The user is then required to add the following websites, *.quickbooks.com and *.intuit.com, in the Address of Website box.
- Moving ahead, the user is required to select and allow each time the user adds the web addresses.
- To end the process, the user needs to hit OK button.
Read also: How I can Access QuickBooks remotely?
For Instant Support Call Us at 1-844-521-0490!
We end this article here, with the hope that it might resolve the Data Protect backup failed issue. Any of the above-enumerated methods can be followed to get rid of the error.
However, if the QB users are unable to tackle the error even after following all or any of the above enumerated methods, then it would be better to talk to some certified QuickBooks support professionals. For that, you can dial our toll-free number and talk to our executives 1(844)521-0490, and get all your issues resolved.
You’ll also like:
How to resolve QuickBooks Error 80070057?