
Planning to start with a new company file and don’t want to start from scratch? Well, it is very much possible for a user to create a new file with the data from the existing QuickBooks company file. One can copy and use accounts, lists (customers, vendors, items, etc.), templates, and preferences from an existing company file to get started. This piece of information is written with an intent to provide with complete steps to start a new company file with data from the existing file. To know more, we would recommend you stay tuned with the post carefully till the end. Moreover, if you are a new QuickBooks user or if you have zero knowledge about QuickBooks, then it would be better to consult a professional, as company file contains sensitive information of the company.
You can consult our professionals at our toll-free customer support number i.e. 1-844-521-0490, and they will guide you through the process to start with a new QuickBooks company file with data from the existing file.
You may also see: How to Print W2 Forms in QuickBooks?
Important points to remember
Before starting with the steps to start a new company file with data from the existing file, the below pointers should be taken into consideration:
- In case the user wishes to create a new file for the reason that he/she is experiencing QuickBooks desktop performance or data issues, then fixing the issues first is recommended
- If the user makes use of QuickBooks desktop assisted payroll, then it is recommended to consult some professional before starting with the steps below.
- Moreover, if the user is making use of QuickBooks desktop payroll, direct deposit, e-file, or e-pay, then it is recommended to ensure that the subscription is only active for one company
- Also, the important point to note is that QuickBooks software might not be able to remove all of the transactions, if the user is having the payroll data for the current year.
For QuickBooks desktop enterprise, enterprise accountant, or premier accountant
In case the user is making use of QuickBooks enterprise or accountant, he/she can use a feature to quickly create new company files from existing ones. This should be considered as a way to create company file templates:
- First of all, the user needs to move to the file menu and then choose new company from existing company file
- After that, choose browse tab and find the company file to be copied
- The next step is to choose the file and after that select open tab
- Followed by, assigning a name to the copy company file
- After completing the steps, the user should choose create company
It should be noted that QuickBooks copies the preferences, sales tax items, memorized report, and chart of accounts to the new company file. Whereas, it neither bring over bank or credit card account, nor does it copy sensitive information like EIN or payroll.
See Also: How to Fix Custom Email Template Issues in QuickBooks Desktop?
Steps to start a new company file using previous one
Now that you are well versed with the information related to start a new company file using the earlier one. Thus, it is the right time to start with the steps listed below:
Step 1: Ensuring that the change is right
The user might have to create a new company file in certain situations, which include the following:
- The company changed from one business type to another (sole proprietorship to partnership, partnership to corporation etc.)
- Or if the user wants to combine different company files in one main file
- Also, to change the process to track inventory
This is where, the user might require the guidance of an accountant. It is very important to find out whether the change is necessary for the user or not.
Step 2: Keeping a copy of the account balances
In case the user hasn’t already, it is recommended to save a copy of the account balances. The user can use the copies to enter the beginning balances. The steps to be followed for this are:
- Initially, the user needs to ensure books are up to date
- And then, move to the Reports menu
- Also, the user should select the report to be kept a copy of:
- Account balance: Selecting company and financial, then balance sheet detail
- Customer balance: Choose customers and receivables and then select customer balance detail
- For vendor balances: The user needs to choose vendors and payables and then vendor balance detail
- In case, the user wishes, he/she can customize the reports to better fit the needs
- Lastly, on the report window, it is recommended to select the print drop-down
- From where, the user can select print, in case he/she wants to keep a physical copy of the report
- And then select save as PDF, if you need a digital copy
Step 3: Exporting the lists from the old company file
The user need not to enter each of the lists manually. One can easily export the accounts and lists from the old company file and carry it over to the new one.
Also Read: What is QuickBooks PDF Converter and how to reinstall it?
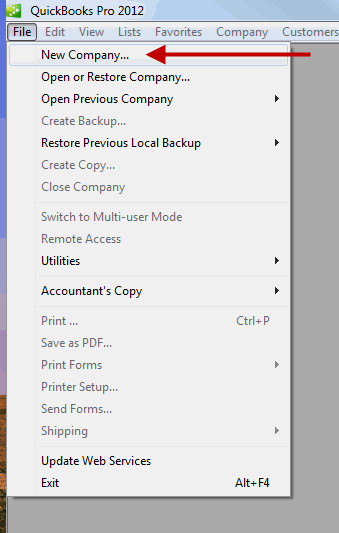
Step 4: Creating a new company file
The user can create a new company file using the below steps:
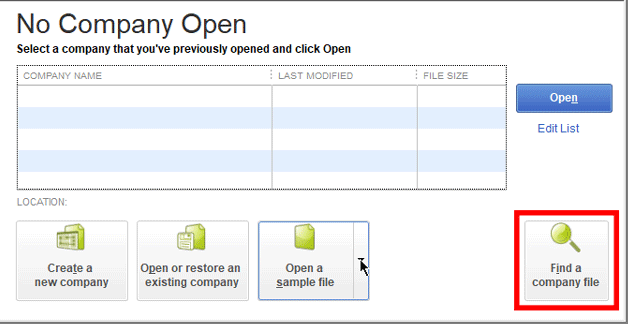
- At first, the user needs to open the QuickBooks desktop
- And then, select create a new company in the no company open window

- The user has two options at this point namely:
- Selecting express start or start setup, in case he/she wants to get started right away. The user will only have to enter the business name, industry, and business type to create the company file. This information can be entered later on.
- Another option is to select the detailed start tab, in order to do a complete setup so all of the information is in from the start
- The user is then required to follow on-screen steps to finish the setup. It should be noted that in case the user is having an existing company file in QuickBooks, a unique name should be assigned to the other one.
Step 5: Importing the lists and enter the beginning balances
After the user is having a new file, he/she can import the lists and enter the accounts’ beginning balances. The user is first required to import the accounts and lists. And once done, he/she should enter the beginning balances.
Step 6: Setting up online banking, payroll, and other services
In case the user is making use of different QuickBooks features and services, he/she can re-set them up to assist in managing the books.
- The user should set up bank accounts for bank feeds
- Set up intuit data protect to back up the new file
- Connect the existing payments account
- Setting up the QuickBooks desktop payroll subscription
- Setting up advanced inventory for QuickBooks desktop enterprise
- Tracking account balances by classes using class tracking
Once done with the above steps, the user can start using the new file.
See Also: How to Fix Errors in Converting QuickBooks Desktop to Online?
To Conclude!
Creating company files from scratch can be a tedious task to carry out, especially when you have an option to start a new QuickBooks company file with data from the existing file. Reading the above steps carefully can surely help in starting a new company file with data from the previous file.
However, if you are stuck at any point of time or in case you want our assistance in any situation, then place a call directly at our QuickBooks enterprise support number i.e. +1-844-521-0490, and leave the rest on our team of professionals.
Recommended readings: