Learn the rectification steps for the QuickBooks error code 12029
While using QuickBooks, have you ever got a pop-up message stating QuickBooks Error code 12029? As per the recent reports, error 12029 has become a common error that frustrates the users. Users often bump into this error while updating the QuickBooks software while trying to update the Payroll. It is always better to troubleshoot the error as early as possible, in order to ensure the smooth working of the software. No doubt, QuickBooks is the finest accounting software, but when it comes to technicalities and codes, these types of glitches are quite common.
If you have to stumble upon any such error, then this article might work wonders for you. In case if you are seeking for expert assistance, then dialing our toll-free number i.e. 1-844-521-0490 would work in your favor.
Read also: Steps to fix QuickBooks error code 6123
What triggers the QuickBooks error 12029?
When it comes to causes of the QuickBooks Error 12029, they can be subdivided into two categories, namely, external causes and internal causes. When a user is trying to update the QuickBooks or is trying to update payroll service, he or she may encounter the error 12029. The user might have to configure the internet security and system firewall for QuickBooks payroll updates. Let us explore both of the categories one by one:
External causes of the error 12029
- The first error can be internet security or the firewall blocking QuickBooks to access the server
- Wrong SSL settings can also be one of the external errors
- Unsupported internet browsers might also lead to such error
- Or the dropped Internet packets might also lead to QuickBooks error 12029
- In case the network time out during QuickBooks Payroll download request.
Internal causes of QuickBooks update error 12029
- QuickBooks connectivity failures might also lead to QuickBooks update errors
- Connection issues in QuickBooks might also cause this error
- Software update timeout might also lead to this kind of error
- Your QuickBooks gets blocked from accessing the server
Read Also: Fix Error Message: “No new transactions” when Importing web connect file
Easy Methods to tackle out the QuickBooks error 12029
Now, as we have learnt the causes of the QuickBooks error 12029, it is now time to explore the relevant solutions to the error. There can be more than one solution to this error. So, let us explore each of the methods one by one.
Method #1: Configuring Antivirus and Firewall
- To configure your firewall, the user is required to download the QuickBooks file doctor tool.
- The next step is to save and run the same tool.
- After that, the tool will configure the Windows Firewall and also will open the firewall ports on its own.
- Lastly, check out whether the error persists.
Method #2: Optimizing the Internet Explorer Browser Settings
- To begin with, the user is required to close the QuickBooks software and after that the open the Microsoft IE.
- After that, visit the Tools, or you can also tap on the Alt key to look for the tools.
- The next step is to open the Internet options and then look for the Security tab.
- Moving ahead, the user is required to search for the Globe symbol and then tap on the same in the security tab window.
- Now, make sure that the security level is set to the medium-high option.
- Then, the user is required to look for the Connections Tab.
- In case the dial-up node is not used, then the user is required to choose the Never Dial a Connection. Or if the user uses the dial-up node, then he/she is required to select the correct internet service provider.
- After that, tap on OK key and then move to the LAN settings.
- The user is then required to look for the automatically detect settings option.

- Once located that, select the same.
- Now, search for the proxy server checkbox. After that, the user is required to document the full address and port.
- The next step is to select the OK option and then Move to the Advanced tab.
- Moving ahead, the user should select the Restore Advanced settings.
- Once completed the above step, then pick the TLS 1.2 option that is available under the Settings tab, followed by hitting OK.
- Now, end the process by closing IE and rebooting the system.
Related article: How I can resolve error code 6190 in QuickBooks?
Solution #3: Verifying Internet Connectivity
- The first step in this process is to open the Internet Explorer and then access any safe website such as www.google.com.
- After that, in case the user can access the website, then he/she should continue to the next troubleshooting step.
- Now, if any kind of error is seen at the time of accessing the website, the user is supposed to check the internet connection setting for any kind of mis-configurations.
- Moving ahead, the user is required to ensure that the time and date of the computer is correct.
- The next step is to open the Internet Explorer and then click on the tools at the top, followed by selecting the Internet options.
- After that, the user is required to click on the Reset/Restore Defaults, under the Advanced tab.
- Now, the user is required to hit Apply and then hit Ok.
- And the final step is to run the update for QuickBooks desktop and payroll.
Solution #4: Updating Internet connection setting
- To begin with, the user is required to open the Internet explorer and then choose Tools option under the Internet options.
- The next step is to click on Delete from the list under the General tab, and then choose Temporary Internet Files, and then click on Delete option once again.
- After that, the user is supposed click on the LAN settings under the connections tab, and then verify that the Automatically Detect Settings checkbox has a check-mark.
- The next step is to ensure that the Proxy server field is blank and then click on OK.
- The last step is to scroll down, and then ensure that there is a check-mark on the TLS 1.2 checkbox TLS 1.0 and TLS1.1 check-box is blank.
You’ll also like: When QuickBooks Printer not activated error code 20 occurs?
Solution #5: Fixing Local system time and internet errors
- The user should make an attempt to update the computer system.
- And then update the QuickBooks accounting software to the latest release.
- After that, check the internet latency to verify any dropped internet packets.
- The user is then required to upgrade the internet explorer and set it as default browser.
- After that correct SSL setting and also ensure that TLS 1.2 must be enabled.
- The next step is to configure the Internet Firewall and Internet security for allowing QuickBooks connections.
- The last and final step is to reboot the system and try updating again.
Solution #6: Installing/updating QuickBooks desktop security certificate
- In this process, the user needs to right click the QuickBooks desktop icon and then click on the Properties option.
- After that, click open file location under the shortcut tab and then hit OK option.
- The next step in this process is to right click the QuickBooks .exe file and then hit Properties option
- Once done with that, the user needs to select QuickBooks from the list and then hit details, under the digital signatures tab
- Moving ahead, the user needs to click on the view certificate option, and then click on install certificate option under the general tab
- Now, ensure to set the current user, as the store location, under the certificate import wizard window, and then hit next.
- The next step in the process is to click on next and finish options respectively.
- And the last step is to click on the OK tab on the import successful window.
Read this also: How to Fix QuickBooks Error Code -6189, 816?
Solution #7: Starting Windows in safe mode
The user is required to start the windows in safe mode, by carrying out the steps below:
- The very first step is to open settings tab by pressing the 2 keys together windows key + I
- And then, look for the update and security tab and also click on it
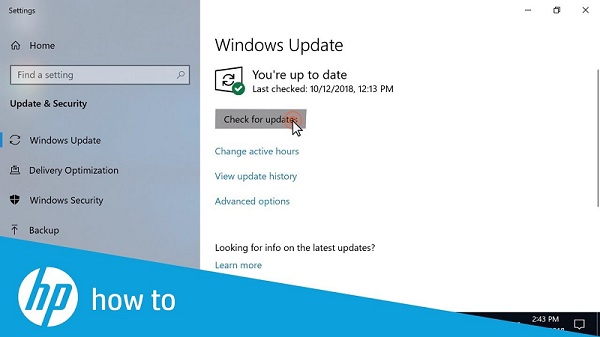
- After that, the user needs to click on the recovery tab
- And also, navigate to the advanced startup
- The next step is to select the restart now tab
- After that the computer will restart
- The user will then have to click on troubleshoot and then click on advanced tabs
- And also, select startup settings and click on the restart tab
- Now, allow the system to reboot and select 5 from the list of options to use your system in safe mode with networking
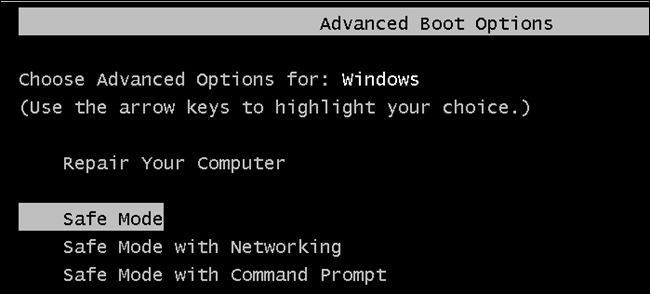
- The last step is to check if the QuickBooks error appears on the screen.
Conclusive Lines!
Following any of the above methods would surely work in rectifying the QuickBooks error 12029. There can be a few other solutions as well that might work in case the above two methods dialed to work. A quick fix to the error can be contacting our toll-free QuickBooks enterprise support team by dialing our toll-free number i.e. 1(844)521-0490
Read also:
Resolve QuickBooks Error 6123, 0